Showing posts with label arduino. Show all posts

Wednesday, June 15, 2016

Controlling MeArm Robot arm from an android device

I recently bought a MeArm robot arm and assembled.


This consists of 4 servo motors to control base, shoulder, elbow and gripper. Later I found "MeArm Controller" android application and decided to configure arduino bluetooth module to complete my setup.

Following is the breadboard view of my configuration.


I found it bit hard to configure the android app for the first time hence decided to note down configuration steps below.

1. Turn bluetooth on and open the application.


2. Press the settings icon (triangle just below Reset button). This should take you to the following screen.


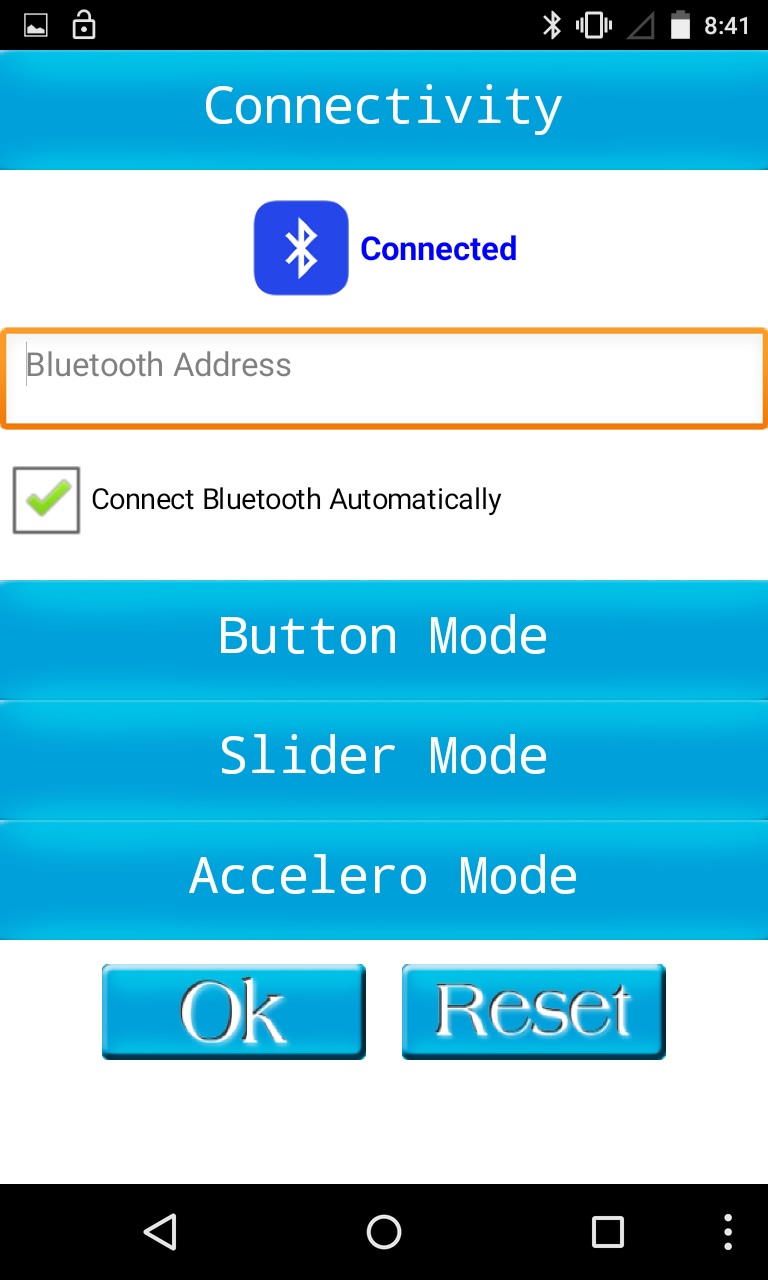
3. Press the Connectivity button.


4. Then tap on the bluetooth icon and select the correct address.
Now you should get a screen saying connected :)


5. Select the slider mode then provide Servo IDs.


6. Press OK and you should get a screen similar to the following, where you have controls to the 4 servo motors.


Here is my messy robot arm config,


Arduino sketch: (Credit to the original creator- I have only  modified baudrate for the bluetooth module)


Friday, April 22, 2016

First shot with the AF_Motor Library

I had to use an Arduino motor shield as a HAT on a uno board, powered by four 1.2V rechargeable batteries, to power-up two DC motors. ( Yes, juice provided by arduino is not enough to power two motors )


Since this is my first library usage, I had to find out how to install a library in my workspace and decided to note the steps as a reference here.

Howto Install the Library-

1. Download the library, in my case AF_Motor from
https://github.com/adafruit/Adafruit-Motor-Shield-library/zipball/master.

2. Unzip and rename to motorsheild and copy in to the sketchbook libraries directory. (Create libaries directory, if not exists)
Eg:- /home/udara/sketchbook/libraries/ directory.

Why Rename: Default library name(adafruit-Adafruit-Motor-Shield-library-89a0973), contains hyphen(-) characters which causes library pickup issue during IDE startup.


3. Start/Restart IDE.

Hint: Browse File> Examples, you should see motorsheild sample sketches.

Friday, April 3, 2015

Simple Optocoupler sample (Introduction to Optocouplers)

What is an Optocoupler? It allows you to connect two circuits which do not share a common power source. There is a small LED inside which will illuminate to close and internal switch when you apply voltage. So this will act as a switch in the second circuit.

I'm going to use following simple arduino sketch to blink a LED connected to a different circuit with the use of a 4N35 optocoupler.
int optocouplerPin = 2;
void setup()
{
  pinMode(optocouplerPin, OUTPUT);
}
void loop()
{
  digitalWrite(optocouplerPin, HIGH);
  delay(1000);
  digitalWrite(optocouplerPin, LOW);
  delay(1000);                  
}
I have prototyped following circuit and connected one end to an arduino uno at the same time other end to a 3V power source. 


After uploading above sketch to my arduino following is my outcome :)

Tuesday, October 21, 2014

Talking to an Arduino from PHP

I was able to talk to my Arduino without using an Ethernet or a wireless shield.
Best part is that I only have 4 lines in my PHP script :)

Things you need to have :

Arduino board with a USB Cable
Breadboard
1 LED
Few jumper wires
220 OHM resistor

Additionally Arduino IDE, PHP, Apache2 installed Linux box :)

1. Connect Arduino's GND pin to breadboard's ground line.
2. Connect Digital pin 13 to breadboard's + line.
3. Connect LED's Anode(long leg) with the breadboard's + line using the 200 OHM resistor.
4. Connect LED's cathode(short leg) with breadboard's - line directly using a jumper cable.

You are done with the circuit prototype, Now connect the Arduino board to your PC.

Open Arduino IDE, click on tools> Serial port. You can see the device connected to a port similar to "/dev/ttyACM0".

Let's write our PHP snippet,

<?php
  $comPort = "/dev/ttyACM0"; /*Update to the correct port */
  $fp =fopen($comPort, "w");
  fwrite($fp, "switch"); /* We are going to write "switch" */
  fclose($fp); 
?>
That is it, host this snippet switch_uno.php within  /var/www/php-arduino directory. lets write our Arduino sketch.

String val;

void setup()
{
    Serial.begin(9600);
    pinMode(13, OUTPUT);
}

void loop()
{
    while (Serial.available()){
        delay(10);
        char c = Serial.read();
        if (c == ','){
            break;
        }

        val+= c;
    }

    if (val == "switch") {
        if(digitalRead(13) == LOW){
            digitalWrite(13, HIGH);
            delay(100);
            Serial.println(1);
        }else if(digitalRead(13) == HIGH){
            digitalWrite(13, LOW);
            delay(100);
            Serial.println(0);
        }
        val="";
    }


}

Upload above sketch to your Arduino and open the serial monitor window within the Arduino IDE.
In order to execute our PHP snippet,
Lets open a terminal window and change directory to the /var/www/php-arduino directory.

run sudo php switch_uno.php your LED will be on :) If you run the same command again LED will be off.

You can do the same by using PHP serial class also.