Thursday, April 30, 2020

mongoDB Atlas optimisation - Part 1

If you are on mongoDB Atlas you might have familiar with alert like this(if alerts are on for this category)


Official documentation says,

“Scanned objects/returned” is similar, except it’s about the number of documents scanned versus the number returned. A large number is a sign that you may need an index on the fields you are querying on. This metric is available for MongoDB 2.6 and newer.

How to over come this?

Within this alert, you can find a link to the Profiler and if you are lucky there is a high chance you can identify the query which triggers above alert here itself. But as you can see in the screenshot below of the Profiler ui,
By default, only operations that took longer than 100ms will be shown.


So if you have a query triggering above alert but not taking 100ms to complete that operation will not be available in the Profile UI. Let's see how we can overcome this.

Since this Profiler tab actually analyzes the MongoDB log rather than the actual database profiler we can lower the threshold(default 100ms) via mongo shell. This will leave the database profiler disabled but lower the threshold of what's logged to the MongoDB log from 100 milliseconds.

1. Let's create a new Database user, which we can use to connect via mongo shell (Can reuse if you have an admin user, but recommended approach would be to create a temporary user considering security)


2. Whitelist your IP Address (if you have enabled access from any IP Address no need to follow this step)


3. Then using the mongo shell you can connect.
mongo "mongodb+srv://<URL>/<DB>" --username <USER>

Note: Connection command can be easily locate if you goto CONNECT>Connect with the mongo shell for your DB cluster


After connecting,

1. db.getProfilingStatus() should give you the current profiling status.
2. To lower the threshold you can execute,
  db.setProfilingLevel(0, { slowms: 50 }) 
This will lower the threshold from 100ms to 50ms but will keep profiling disabled as denoted by 0.
You can keep this setting for 5-6 hours during the peak usage, so profiler UI should be able to gather as much as information. With this information you can identify indexing updates you can do to get rid of above alert.

Note: we can run this multiple rounds lowering the slowms eg:- 25, 15, 10 to further analyse

Once you are done with all improvements make sure to set it back at default 100ms as this can add more load to the system.


Friday, April 24, 2020

Google Add-on framework support for long-running process or polling support

Assume we have a GSuite Add-on,

a. Invoking a long-running process
b. Invoking an async process which we need to check status periodically

Both the above won't be directly supported within the Apps Script framework for GSuite Add-ons, given (a) script framework imposed limitations. 
Eg:- Script execution timeout, Trigger timeout
(b) limitation of embedding <script> tags within Add-on UI

These limitations are imposed to keep Add-ons responsive as well as secure by the framework. But if you are publishing your Apps Script project as a web app(not from the manifest as an Add-on) there are built-in APIs to poll as well as we can include our own custom scripts. Discussion related to this can be found here. 

Back to the topic, 
Overcome the script execution timeout,

If your AppsScript project is on the legacy Rhino runtime based framework upgrade it to use the latest V8 based framework.


With this you will gain approximately +30 seconds of more execution time, which now will be 60 seconds opposed to the 30 seconds earlier.

But if this is still not enough for your requirement, and you require to poll on the status periodically there is not soo sleek workaround to get over it.


pre-requisites:

You need to host a separate app(on a different service provider) to do the heavy lifting, the actual task completion can go beyond 2 seconds and also polling logic can be defined here itself.

As an example, I have the following snippet running to mock the actual long-running task which takes 5 minutes to respond


Then I have the following page hosted which is used by the AppsScript code, and this is invoking the above service(mock long running task) and respond back after 5 minutes.


Note: Make sure to replace <NGROK_URL> with the URL to the above service, at the same time, you can combine these two and house above timeout function within here itself.


To invoke this long-running service I'm to use `setOpenLink` class resides within the `CardService` provided by the AppsScript F/W.


There are a couple of things which we need to focus here during the creation of the `htmlUrl`
eg:- getRedirectURI(), generateNewStateToken, asyncCallback

getRedirectURI() is a simple function within the AppsScript which returns the redirect URI which we have to call once our long-running task is done.


function getRedirectURI() {
    return "https://script.google.com/macros/d/" + ScriptApp.getScriptId() + "/usercallback";
}

generateNewStateToken, returns a state token which can be used along with our callback.


function generateNewStateToken(callbackName, user_info) {
  return ScriptApp.newStateToken()
    .withMethod(callbackName)
    .withArgument("user_info", JSON.stringify(user_info))
    .withTimeout(3600)
    .createToken();
}

asyncCallback, is the implementation of our callback function, here success is a html file created within the AppsScript Project which indicates our long running process is completed.


function asyncCallback(data) {
    Logger.log("Inside asyncCallback: " + JSON.stringify(data));
    return HtmlService.createHtmlOutputFromFile("success");
}

Outcome: When you open the Add-on you will get the link button, which invokes the long-running task which is hosted on a different service.


This should open a new browser-tab/popup based on your `setOpenAs` config and once the long-running process is completed this should automatically get updated and closed. Based on your `setOnClose` configuration Add-on UI might refresh too.

Note: This is the not soo sleek part which I have mentioned earlier in this post.


Github link to the full AppsScript source will be published soon.

Thursday, November 23, 2017

How to find wireless network frequency

There are situations where we need to find out our wireless network frequency.
Eg:- before purchasing network devices we need to verify whether we are in a 2.4 or 5 GHz network

Usage of iwlist command on a linux box,
iwlist <WIRELESS INTERFACE> scanning | grep -C3 <WIRELES_NETWORK_NAME>


Eg:
 iwlist wlp4s0 scanning | grep -C3 VM6292804
                    Frequency:2.412 GHz (Channel 1)
                    Quality=47/70  Signal level=-63 dBm 
                    Encryption key:on
                    ESSID:"VM6292804"
                    Bit Rates:1 Mb/s; 2 Mb/s; 5.5 Mb/s; 11 Mb/s; 6 Mb/s
                              9 Mb/s; 12 Mb/s; 18 Mb/s
                    Bit Rates:24 Mb/s; 36 Mb/s; 48 Mb/s; 54 Mb/s

Sunday, July 23, 2017

Running different MySQL Servers inside a single host

There are many circumstances where running different MySQL server versions required. Eg:- testing

Spinning MySQL docker instance is the easiest way I have found among multiple methods.
sudo docker run --name mysql56 -p 127.0.0.1:3316:3306 -e MYSQL_ROOT_PASSWORD=root -d mysql:5.6

This command will download and spin a MySQL 5.6 container. At the same time it will map the default 3306 port in to the 3316 of the host machine.

Thursday, July 20, 2017

How to hide your application name using nginx proxy_pass directive

For the showcase purpose I will be using the store application which resides inside WSO2 API Manager 2.1.0

Following are API Manager specific configs which needs to be done.

1. Set proxyPort attribute for connector configs resides in <AM_HOME>/repository/conf/tomcat/catalina-server.xml file.

        <Connector protocol="org.apache.coyote.http11.Http11NioProtocol"
                   port="9763"
                   redirectPort="9443"
                   proxyPort="80"
                   bindOnInit="false"
                   maxHttpHeaderSize="8192"

         />

        <Connector protocol="org.apache.coyote.http11.Http11NioProtocol"
                   port="9443"
                   proxyPort="443"
                   bindOnInit="false"
                   sslProtocol="TLS"
                   maxHttpHeaderSize="8192"
          />

Note that I have removed some attributes for brevity.

2. Update reverseProxy configuration resides inside <AM_HOME>/repository/deployment/server/jaggeryapps/store/site/conf/site.json

    "reverseProxy" : {
        "enabled" : true, 

        "host" : "localhost",
        "context":"",
    }

After above changes start/restart the AM node.


Now the Nginx configuration,

Make sure to generate and store SSL certificate and the key within /etc/nginx/ssl directory.

For the explanation purpose I will be having two server blocks, which can be consolidated to a one.

server{
    listen 80;
    server_name localhost;
    location / {
            proxy_pass http://localhost:9763/store/;
            proxy_redirect off;
            proxy_set_header Host $host;
            proxy_set_header X-Real-IP      $remote_addr;
            proxy_set_header X-Forwarded-For $proxy_add_x_forwarded_for;
            include /etc/nginx/proxy_params;
            proxy_cookie_path ~*^/.* /;
    }
}
server{
    listen 443 ssl;
    ssl_certificate /etc/nginx/ssl/nginx.crt;
    ssl_certificate_key /etc/nginx/ssl/nginx.key;
    server_name localhost;
    location / {
            proxy_pass https://localhost:9443/store/;
            proxy_redirect off;
            proxy_set_header Host $host;
            proxy_set_header X-Real-IP      $remote_addr;
            proxy_set_header X-Forwarded-For $proxy_add_x_forwarded_for;
            include /etc/nginx/proxy_params;
            proxy_cookie_path ~*^/.* /;
    }
}

After reloading the newly added config browse https://localhost or https://localhost,


Thursday, June 22, 2017

Download a part of YouTube video as mp3

I will be using ffmpeg and youtube-dl installed linux distro (Ubuntu 16.04 LTS)
ffmpeg -ss 00:00:00.0000 -i $(youtube-dl -f 22 --get-url <YOUTUBE_LINK>) -t 00:00:00.0000 -acodec libmp3lame -qscale:a 0 sample.mp3
Fill <YOUTUBE_LINK> with the link to YouTube video.

Find further explanation of above command here,
  • -ss : start of the stream 00:00:00.0000 stands for hour:minute:second.millisecond
  • -i   : provide the input, here we will be using an output from youtube-dl.
  • -t   : length of the stream

Further information about bitrate selection (-qscale:a 0) can be found here.
  • libmp3lame is the audio encoding used for this purpose.
  • sample.mp3 is the output file of above command.

Wednesday, February 22, 2017

Troubleshooting Firebird Database

Note:  I will be using the employee database(/opt/firebird/examples/empbuild/employee.fdb) which is available by-default with the Firebird 2.5.7  in this post.

How to connect to a Firebird Database and test (using command-line)


1. Go to /opt/firebird/bin directory.
2. Run ./isql (Command-line tool for Firebird)
udara@Razorx1:/opt/firebird/bin$ ./isql
Use CONNECT or CREATE DATABASE to specify a database
SQL>
3. Run connect "/opt/firebird/examples/empbuild/employee.fdb"
SQL> connect "/opt/firebird/examples/empbuild/employee.fdb"
CON>
4. Provide the user/password to connect, note the semicolon (;) at the end.
CON> user 'SYSDBA' password 'admin';
Database:  "/opt/firebird/examples/empbuild/employee.fdb", User: SYSDBA
SQL>

5. Run the intended query,
SQL> select * from employee;

 EMP_NO FIRST_NAME      LAST_NAME            PHONE_EXT                 HIRE_DATE DEPT_NO JOB_CODE JOB_GRADE JOB_COUNTRY                    SALARY FULL_NAME                            
======= =============== ==================== ========= ========================= ======= ======== ========= =============== ===================== =====================================
      2 Robert          Nelson               250       1988-12-28 00:00:00.0000  600     VP               2 USA                         105900.00 Nelson, Robert                       
      4 Bruce           Young                233       1988-12-28 00:00:00.0000  621     Eng              2 USA                          97500.00 Young, Bruce                         
      5 Kim             Lambert              22        1989-02-06 00:00:00.0000  130     Eng              2 USA                         102750.00 Lambert, Kim                         
      8 Leslie          Johnson              410       1989-04-05 00:00:00.0000  180     Mktg             3 USA                          64635.00 Johnson, Leslie                      
      9 Phil            Forest               229       1989-04-17 00:00:00.0000  622     Mngr             3 USA                          75060.00 Forest, Phil                         
     11 K. J.           Weston               34        1990-01-17 00:00:00.0000  130     SRep             4 USA                          86292.94 Weston, K. J.                        
     12 Terri           Lee                  256       1990-05-01 00:00:00.0000  000     Admin            4 USA                          53793.00 Lee, Terri  
 

How to enable trace configuration

1. Open /opt/firebird/fbtrace.conf in your favorite text editor and update relevant configuration.

How to trace the database

1. Go to /opt/firebird/bin directory.
2. Run ./fbtracemgr with proper parameter set.
udara@Razorx1:/opt/firebird/bin$ ./fbtracemgr -SE service_mgr -START -NAME fire -CONFIG ../fbtrace.conf -USER SYSDBA -PASS admin

Sample trace output for the select * from employee;query.

2017-02-22T11:58:23.2200 (1980:0x7f85df7ae678) TRACE_INIT
    SESSION_4 fire
   

2017-02-22T11:58:23.2210 (1980:0x7f85df7ae678) PREPARE_STATEMENT
    /opt/firebird/examples/empbuild/employee.fdb (ATT_63, SYSDBA:NONE, NONE, TCPv4:127.0.0.1)
    /opt/firebird/bin/isql:7445
        (TRA_264, READ_COMMITTED | NO_REC_VERSION | WAIT | READ_WRITE)

Statement 128:
-------------------------------------------------------------------------------
select * from employee
      0 ms

2017-02-22T11:58:23.2210 (1980:0x7f85df7ae678) FREE_STATEMENT
    /opt/firebird/examples/empbuild/employee.fdb (ATT_63, SYSDBA:NONE, NONE, TCPv4:127.0.0.1)
    /opt/firebird/bin/isql:7445

Statement 127:
-------------------------------------------------------------------------------
select * from employee

2017-02-22T11:58:23.2220 (1980:0x7f85df7ae678) EXECUTE_STATEMENT_START
    /opt/firebird/examples/empbuild/employee.fdb (ATT_63, SYSDBA:NONE, NONE, TCPv4:127.0.0.1)
    /opt/firebird/bin/isql:7445
        (TRA_263, CONCURRENCY | WAIT | READ_WRITE)

Statement 128:
-------------------------------------------------------------------------------
select * from employee

2017-02-22T11:58:23.2260 (1980:0x7f85df7ae678) CLOSE_CURSOR
    /opt/firebird/examples/empbuild/employee.fdb (ATT_63, SYSDBA:NONE, NONE, TCPv4:127.0.0.1)
    /opt/firebird/bin/isql:7445

Statement 128:
-------------------------------------------------------------------------------
select * from employee


Firebird trace utility

Firebird Trace utility.
Usage: fbtracemgr <action> [<parameters>]

Actions:
  -STA[RT]                              Start trace session
  -STO[P]                               Stop trace session
  -SU[SPEND]                            Suspend trace session
  -R[ESUME]                             Resume trace session
  -L[IST]                               List existing trace sessions

Action parameters:
  -N[AME]    <string>                   Session name
  -I[D]      <number>                   Session ID
  -C[ONFIG]  <string>                   Trace configuration file name

Connection parameters:
  -SE[RVICE]  <string>                  Service name
  -U[SER]     <string>                  User name
  -P[ASSWORD] <string>                  Password
  -FE[TCH]    <string>                  Fetch password from file
  -T[RUSTED]  <string>                  Force trusted authentication

Examples:
  fbtracemgr -SE remote_host:service_mgr -USER SYSDBA -PASS masterkey -LIST
  fbtracemgr -SE service_mgr -START -NAME my_trace -CONFIG my_cfg.txt
  fbtracemgr -SE service_mgr -SUSPEND -ID 2
  fbtracemgr -SE service_mgr -RESUME -ID 2
  fbtracemgr -SE service_mgr -STOP -ID 4

Firebird sample with WSO2 DSS

I'm going to provide instructions to showcase how we can use Firebird data-source with WSO2 DSS.

Note:
I will be using the employee database(/opt/firebird/examples/empbuild/employee.fdb) which is available by-default with the Firebird 2.5.7  in this post.

Following are the Firebird/JDBC driver and WSO2 DSS versions which I have tried.
  • Firebird: 2.5.X
  • JDBC Driver: jaybird-full-2.2.12
  • WSO2 DSS: 3.5.1
Steps:
  1. Download the JDBC driver for Firebird and copy into the <DSS_HOME>/repository/components/lib/ directory.
  2. Start the DSS node.(or restart if it's already started)
  3. Add a new Data Service with the following configuration.
Datasource type: RDBMS
Database Engine: Generic
Driver Class: org.firebirdsql.jdbc.FBDriver
URL: jdbc:firebirdsql://localhost:3050//opt/firebird/examples/empbuild/employee.fdb

* Provide Host, Port, Database Path, User Name, Password accordingly.

Create and test the Datasource connection.


Save and proceed next, to add the query
select EMP_NO,FIRST_NAME,
LAST_NAME,PHONE_EXT,HIRE_DATE,DEPT_NO,SALARY from employee where EMP_NO=:EMP_NO


Add Input/Output mappings accordingly.


Save and proceed next, to add the operation.


Save and finish.

Now if you go to the Home> Manage> Services> List> firebirdTest> Edit Data Source(XML Edit) you can see the following Data Service definition.

<data disableStreaming="true" name="firebirdTest" transports="http https local">
   <config enableOData="false" id="emp">
      <property name="driverClassName">org.firebirdsql.jdbc.FBDriver</property>
      <property name="url">jdbc:firebirdsql://localhost:3050//opt/firebird/examples/empbuild/employee.fdb</property>
      <property name="username">SYSDBA</property>
      <property name="password">admin</property>
   </config>
   <query id="select" useConfig="emp">
      <sql>select EMP_NO,FIRST_NAME,&#xd;LAST_NAME,PHONE_EXT,HIRE_DATE,DEPT_NO,SALARY from employee where EMP_NO=:EMP_NO</sql>
      <result element="Entries" rowName="Entry">
         <element column="EMP_NO" name="EMP_NO" xsdType="string"/>
         <element column="FIRST_NAME" name="FIRST_NAME" xsdType="string"/>
         <element column="LAST_NAME" name="LAST_NAME" xsdType="string"/>
         <element column="PHONE_EXT" name="PHONE_EXT" xsdType="string"/>
         <element column="HIRE_DATE" name="HIRE_DATE" xsdType="string"/>
         <element column="DEPT_NO" name="DEPT_NO" xsdType="string"/>
         <element column="SALARY" name="SALARY" xsdType="string"/>
      </result>
      <param name="EMP_NO" sqlType="STRING"/>
   </query>
   <operation disableStreaming="true" name="getEmp">
      <call-query href="select">
         <with-param name="EMP_NO" query-param="EMP_NO"/>
      </call-query>
   </operation>
</data>
How to test the data-service(Try-it tool)

Go to Home> Manage> Services> List> firebirdTest> Try this service.

Provide the EMP_NO and press send.


Further information on query/input and output mappings/operation can be found here.

Wednesday, June 15, 2016

Controlling MeArm Robot arm from an android device

I recently bought a MeArm robot arm and assembled.


This consists of 4 servo motors to control base, shoulder, elbow and gripper. Later I found "MeArm Controller" android application and decided to configure arduino bluetooth module to complete my setup.

Following is the breadboard view of my configuration.


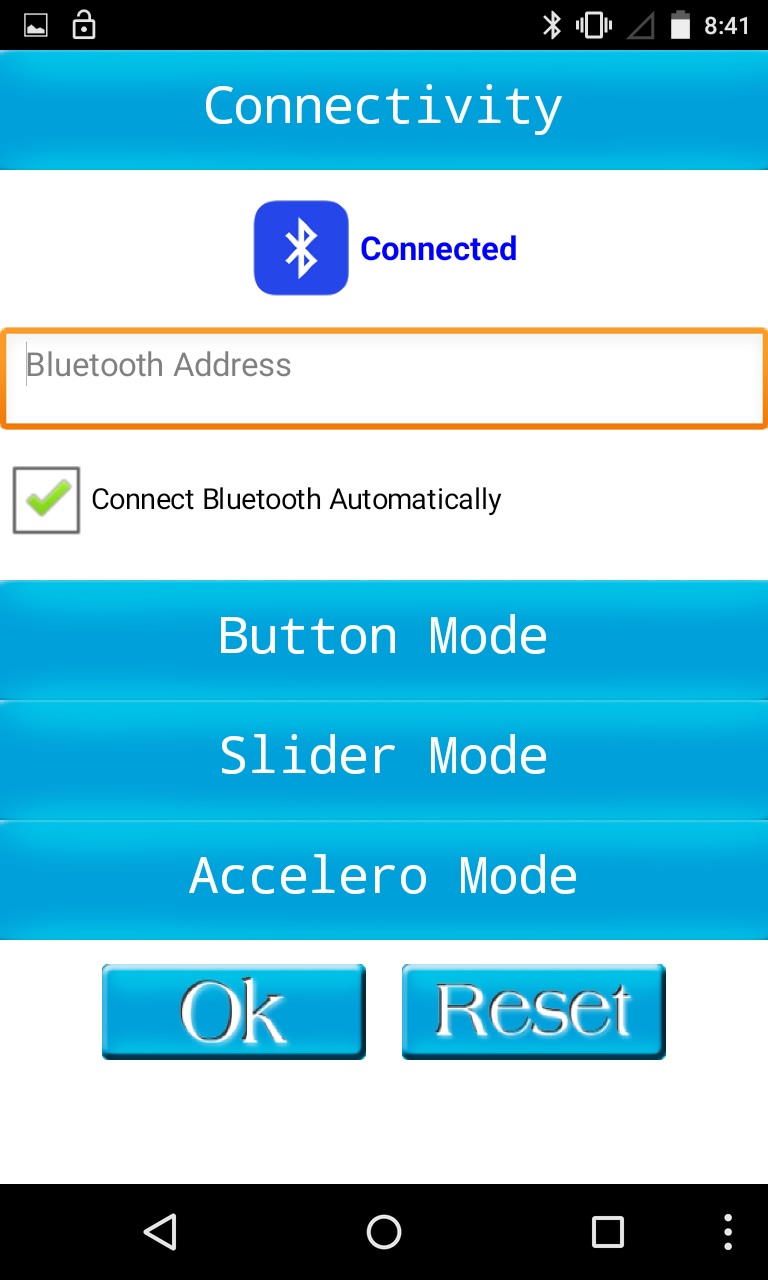
I found it bit hard to configure the android app for the first time hence decided to note down configuration steps below.

1. Turn bluetooth on and open the application.


2. Press the settings icon (triangle just below Reset button). This should take you to the following screen.


3. Press the Connectivity button.


4. Then tap on the bluetooth icon and select the correct address.
Now you should get a screen saying connected :)


5. Select the slider mode then provide Servo IDs.


6. Press OK and you should get a screen similar to the following, where you have controls to the 4 servo motors.


Here is my messy robot arm config,


Arduino sketch: (Credit to the original creator- I have only  modified baudrate for the bluetooth module)


Wednesday, June 8, 2016

Measure performance of a given JavaScript code

console.time("for loop");
for(var i=0; i < 100; i++){
  console.log("i is: " + i);
}
console.timeEnd("for loop");

Wednesday, April 27, 2016

How to add git branch name to the command line

How many times you run the git branch command to find out which branch you in?

Following will help you to overcome above hassle and have a quick glance at your branch name.


1. Open /home/<USER>/.bashrc file.
2. Add following to the bashrc, save and exit.
parse_git_branch() {
 git branch 2> /dev/null | sed -e '/^[^*]/d' -e 's/* \(.*\)/(\1)/'
}
if [ "$color_prompt" = yes ]; then
 PS1='${debian_chroot:+($debian_chroot)}\[\033[01;32m\]\u@\h\[\033[00m\]:\[\033[01;34m\]\w\[\033[01;31m\]$(parse_git_branch)\[\033[00m\]\$ '
else
 PS1='${debian_chroot:+($debian_chroot)}\u@\h:\w$(parse_git_branch)\$ '
fi
unset color_prompt force_color_prompt
3. Open a new terminal window and browse your git repo :)

Friday, April 22, 2016

First shot with the AF_Motor Library

I had to use an Arduino motor shield as a HAT on a uno board, powered by four 1.2V rechargeable batteries, to power-up two DC motors. ( Yes, juice provided by arduino is not enough to power two motors )


Since this is my first library usage, I had to find out how to install a library in my workspace and decided to note the steps as a reference here.

Howto Install the Library-

1. Download the library, in my case AF_Motor from
https://github.com/adafruit/Adafruit-Motor-Shield-library/zipball/master.

2. Unzip and rename to motorsheild and copy in to the sketchbook libraries directory. (Create libaries directory, if not exists)
Eg:- /home/udara/sketchbook/libraries/ directory.

Why Rename: Default library name(adafruit-Adafruit-Motor-Shield-library-89a0973), contains hyphen(-) characters which causes library pickup issue during IDE startup.


3. Start/Restart IDE.

Hint: Browse File> Examples, you should see motorsheild sample sketches.

Sunday, April 3, 2016

how to resolve "M: bad interpreter" while working with bash scripts

This is a common problem if you try to port a script created in windows environment to unix,
 /bin/bash^M: bad interpreter: No such file or directory
How to solve this,

run dos2unix <BASH_SCRIPT>
Eg:- dos2unix run.sh

For further information: http://www.linuxcommand.org/man_pages/dos2unix1.html

Wednesday, March 2, 2016

Getting HTTP response back from a CURL POST request

CURL request:
curl -H "Content-Type: application/json" -H "Authorization: Basic <AUTH_VALUE>" -X POST -d '<BODY_CONTENT>' <EP_URL> -k -i

Sample request:

curl -H "Content-Type: application/json" -H "Authorization: Basic YWRtaW46YWRtaW" -X POST -d 'MBfcEW/91R0VTobzhbC0ZGjGvHN4c9OXFsbByP8s9IwJErS5FVAgOhzxAJCLh3tfl0MJad5joQ7X5jl7mAzy40Rjv6Pe4wVghjVjdmofYL/fuX8m/pToUmvWc9t7S4DER31lGPBrlWEpEtIk/Nj025Xm5/cvAsUXpuTvLeOYt5v+cYHHmNtulG1dEfzMYQbjTQ1W/TVvWHG8LUfdXvVXt0R3QI6r/DnVszVIOKDbpD7OdKkLQ9J7W4kOSDZL1euIaSaWfLr0l+K0M+Eme1jG9np/qmNXOGZZyXR+ETpGuPDASV3TVK9hXKH18COwQ//e0db+6bGSPLPIb1KcshKIz4xZ3z15OaXDHRzZx71gFO4raVYIQAbxlx0wSw/D2Ap1qkXvBYFGIqAW+NPzVCGu/8Vu9BaUcSBZ5v1v4RKstWHKmaRTlRpRs0i1uEBoZHuw3sCN+HWLeIIjjNcWpNs3L1E1H/Wzny3uxwiPqZolA4LsnRj8kY5yJ1FoqNFs+i2lPqUvLhQZMCvPCF+onIQd1DImgK/VZSgDXNxRpo0N+6ZJEBMLAVWRSCHtHO28DLSBKjeacELa6jfzLEEE2cJIbTyjrGsQ+YTEHgL8zuQNIZZD5yO0bO4DU3eSGN66r4snnL+YC7r8cBfl8DQCBaWLNfs18eYtaOxwOJnqcZYI/8sWk8bFNDGgNn3imE3U1RpJrNZA68d53owzE0PQvZKkJIdR+Oy2W0wGcpjVOXj3HXLTXmjR9y/R/eZZ2nzvrPjwnnBGRYcX0pwenH+PSv+KSrilr6Z3cYWMlC8SUXDaHsXG6Pk3lxZX1sHziX0Sdgwb+KBtqpm5amU6rdBfSDmHO+Km3wxehlDh8Nv2BpwxWm1QGaXD1UXRyWLb5PgHPXPv21tG+kvhjoSYSUuXyMecnd8pwbjE1jRublcOvoMiXCLSd7lA9cg5TSTU0KgkR7N0E0Bt+znbpITiNqpmOhA9bjMwQyr5J6tzO8CjLL992Hn6WUe7mxu6Va9bv0kww6xyBSPdOXOfyDz/CxDZLtUsnmi2Fi70tmSAz690jzgaoupH8X2O7JhzRX7v+EMow5xqXPZ3i3d2FcvBjssmFPZh10Y13+sSTRWn3ciYcfx2c+/a00c+bxMSFg0FWEtcpptY0tQkJhrGn+f49ARDk2wZoYEBLkE/KKnpvk1p6HFFwkJsHdslrtV5QDjzRVPGx5rIrt1Sp3qhOFAYHnAoxF6XcgTLx8+q2tUlft+XdTy61zo/So1/+n6VxawCwZIkn5UHzAfAL2BaYA4OaqMnTY97s6ILCip4e5+/CKzT7LbL14cAjVs6fI4lZ/9nsuSgpTPBqzhvSzKRx3Pjg4TllcjaFyq0/f6MAEnSSz2Ir2tL5ue0fLI29YSLDfa6+R2t0fKvqkklg3/KhMs4vWlr/g2oFVyCtZWIWXXtnzN/z8g86H9UJv5FAg0x2/p/TXF87g+gYLgMGDAGuMWCHH2D789EXrdOq/hNnFDqoYoO9OzqnFWktO3Hjg7cqGUEVHlIwNuDxabzeGsj5zW+72F8gODWFKV1O10I+zEmA4RMdXkBlUz515jt/w/Q/Sb8SazMqEgzhL4LPsV6bFX9pSN8nb9PiI/6sXq2sTGIdN/czqrRE7j/xBywhvcZXA9g+8yiUnZKwJ5YQkoAIKCySh0auw19/GqaU4bwt3TPBuomW3UTdHE=' https://localhost:9443/endpoints/PageLogEventReceiver -k -i

Sample response: 

HTTP/1.1 401 Unauthorized
Set-Cookie: JSESSIONID=B083D193C0722F2CA8021BA2021BA4F0; Path=/; Secure; HttpOnly
Content-Type: text/html;charset=UTF-8
Content-Length: 14
Date: Wed, 02 Mar 2016 16:30:48 GMT
Connection: close
Server: WSO2 Carbon Server

_AUTH_FAILURE_

Friday, February 19, 2016

WSO2 ESB Mutual SSL - Certificate exchange

We need to consider two scenarios here.

1. External system act as a client to ESB. 
     Eg:- SOAP UI invoking ESB proxy

2. External system is a server to ESB.
    EG:- ESB invoking external service

Following image depicts all certificate exchange steps to cater above scenarios.


Wednesday, February 17, 2016

how to import a private key in to JKS

Lets take following scenario where you implement an application based on asymmetric cipher (Eg:- RSA). Assume you are responsible for the decryption part, where you have to use the given private key to handle this.


Probably you will get only the private key or private key and the certificate. I'm going to take the first instance assuming you have only the private key.

Note :- assume name of the private key is private_key.pem

1. Create a certificate sign request using the given private key.
openssl req -new -key private_key.pem -out key_cert_r.csr
2. Get the certificate signed by an authorized party/self-sign.
Self-sign:
openssl x509 -req -days 365 -in key_cert_r.csr -signkey private_key.pem -out key_cert.crt
3. Generate a pkc12 key store using the private key and above certificate.
openssl pkcs12 -export -name alias -in key_cert.crt -inkey private_key.pem -out keystore.p12
4. Generate a java key-store using above pkc12 keystore.
keytool -importkeystore -destkeystore tmp_keystore.jks -srckeystore keystore.p12 -srcstoretype pkcs12 -alias alias

If you already have java key store configured within your application, let's merge above tmp_keystore.jks with the existing key store.
keytool -importkeystore -destkeystore existing_keystore.jks -srckeystore tmp_keystore.jks

Sunday, February 7, 2016

SVN cheat sheet

This is not the place to learn SVN commands, I'm just creating this as a  reference to some important commands.

Revert local file change

svn revert <file_name>

Take a diff from two revisions

svn diff -r <old_revision>:<new_revision>

Update to the latest revision

svn update "<path>"

Update to a specific revision

svn update -<revision_number> "<path>"

Add new files/directory to track

svn add <file_name>|<directory_name>

Delete with a message

svn -m "<messahe>" delete "<path>"

Saturday, January 30, 2016

Build Carbon Application(capp) for WSO2 DAS

You need to work with multiple artifact types while working with WSO2 DAS. Following is a list of artifacts supported in WSO2 DAS, (Tried both DAS 3.0.0 and 3.0.1)


  • Event Streams
  • Event Stores
  • Even Receivers
  • Analytic Scripts
  • Execution Plans
  • Gadgets
  • Layouts
  • Dashboards


Rather than deploying these artifacts one by one we can deploy a set of artifacts using a single deployable artifact, Carbon Application (capp)[1]. Here what we do is, create an archive with .car extension and deploy using management console.


But there can be usecases where we need to build above archive programmatically, using a build tool. Here I’m using Maven to fulfil above requirement.


Assume we have all artifacts within das-capp directory,


.
├── das-capp
│   ├── artifacts.xml
│   ├── Dashboard_1.0.0
│   ├── Eventreceiver_1.0.0
│   ├── Eventstore_1.0.0
│   ├── Eventstream_1.0.0
│   ├── GadgetTotalDailyViews_1.0.0
│   ├── GadgetViewsPreviousmonth_1.0.0
│   ├── GagdetPageFilter_1.0.0
│   ├── Layout_1.0.0
│   └── Sparkscripts_1.0.0
└── pom.xml

pom.xml


<?xml version="1.0" encoding="UTF-8"?>
<project xsi:schemaLocation="http://maven.apache.org/POM/4.0.0 http://maven.apache.org/xsd/maven-4.0.0.xsd" xmlns="http://maven.apache.org/POM/4.0.0"
    xmlns:xsi="http://www.w3.org/2001/XMLSchema-instance">
 <modelVersion>4.0.0</modelVersion>
 <groupId>org.wso2.das.example</groupId>
 <artifactId>das-capp</artifactId>
 <version>1.0.0-SNAPSHOT</version>
 <packaging>pom</packaging>
 <name>DAS CAR</name>
 <description>This project contains artifacts to process and display sample capp</description>
 <properties>
    <artifact.types>jaggery/app=zip,service/rule=aar,lib/library/bundle=jar,event/receiver=xml,synapse/message-processors=xml,synapse/endpointTemplate=xml,synapse/message-store=xml,synapse/proxy-service=xml,event/execution-plan=siddhiql,carbon/application=car,registry/resource=zip,lib/dataservice/validator=jar,synapse/endpoint=xml,web/application=war,synapse/inbound-endpoint=xml,synapse/sequence=xml,synapse/configuration=xml,lib/registry/handlers=jar,synapse/task=xml,service/meta=xml,webapp/jaxws=war,synapse/api=xml,synapse/lib=zip,bpel/workflow=zip,lib/registry/filter=jar,service/dataservice=dbs,event/publisher=xml,synapse/local-entry=xml,synapse/priority-executor=xml,synapse/event-source=xml,synapse/template=xml,event/stream=json,lib/carbon/ui=jar,service/axis2=aar,synapse/sequenceTemplate=xml,wso2/gadget=dar,lib/synapse/mediator=jar</artifact.types>
 </properties>
 <build>
    <pluginManagement>
     <plugins>
       <plugin>
         <artifactId>maven-antrun-plugin</artifactId>
         <version>1.7</version>
       </plugin>
     </plugins>
    </pluginManagement>
    <plugins>
     <plugin>
       <artifactId>maven-antrun-plugin</artifactId>
       <executions>
         <execution>
           <phase>process-resources</phase>
           <goals>
             <goal>run</goal>
           </goals>
           <configuration>
             <tasks>
               <zip destfile="target/das-example.car">
                 <zipfileset dir="das-capp" />
               </zip>
             </tasks>
           </configuration>
         </execution>
       </executions>
     </plugin>
    </plugins>
 </build>
</project>


You can build above using mvn clean install and find the capp artifact within target/ directory. Then we can upload this deployable artifact to WSO2 DAS using management console.


[1] https://docs.wso2.com/display/DAS301/Packaging+Artifacts+as+a+C-App+Archive